Unveiling PDF Parsing (실습)
by Cori해당 포스트는 Medium 'Florian June'이 작성한 Advanced RAG 포스트 시리즈 두 번째 내용을 실제로 실습하는 과정을 정리하며, PDF 문서를 효과적으로 처리하는 방법에 대해 다룬다. 이론적인 부분은 다음 글을 참고하자.
Advanced RAG #02. Unveiling PDF Parsing (이론)
해당 포스트는 Medium 'Florian June'이 작성한 Advanced RAG 포스트 시리즈 그 두 번째 내용을 정리하며, PDF 문서를 효과적으로 처리하는 방법에 대해 다루고 있다. 실제 작업에서는 비구조화된 데이터
cori.tistory.com
사용 데이터
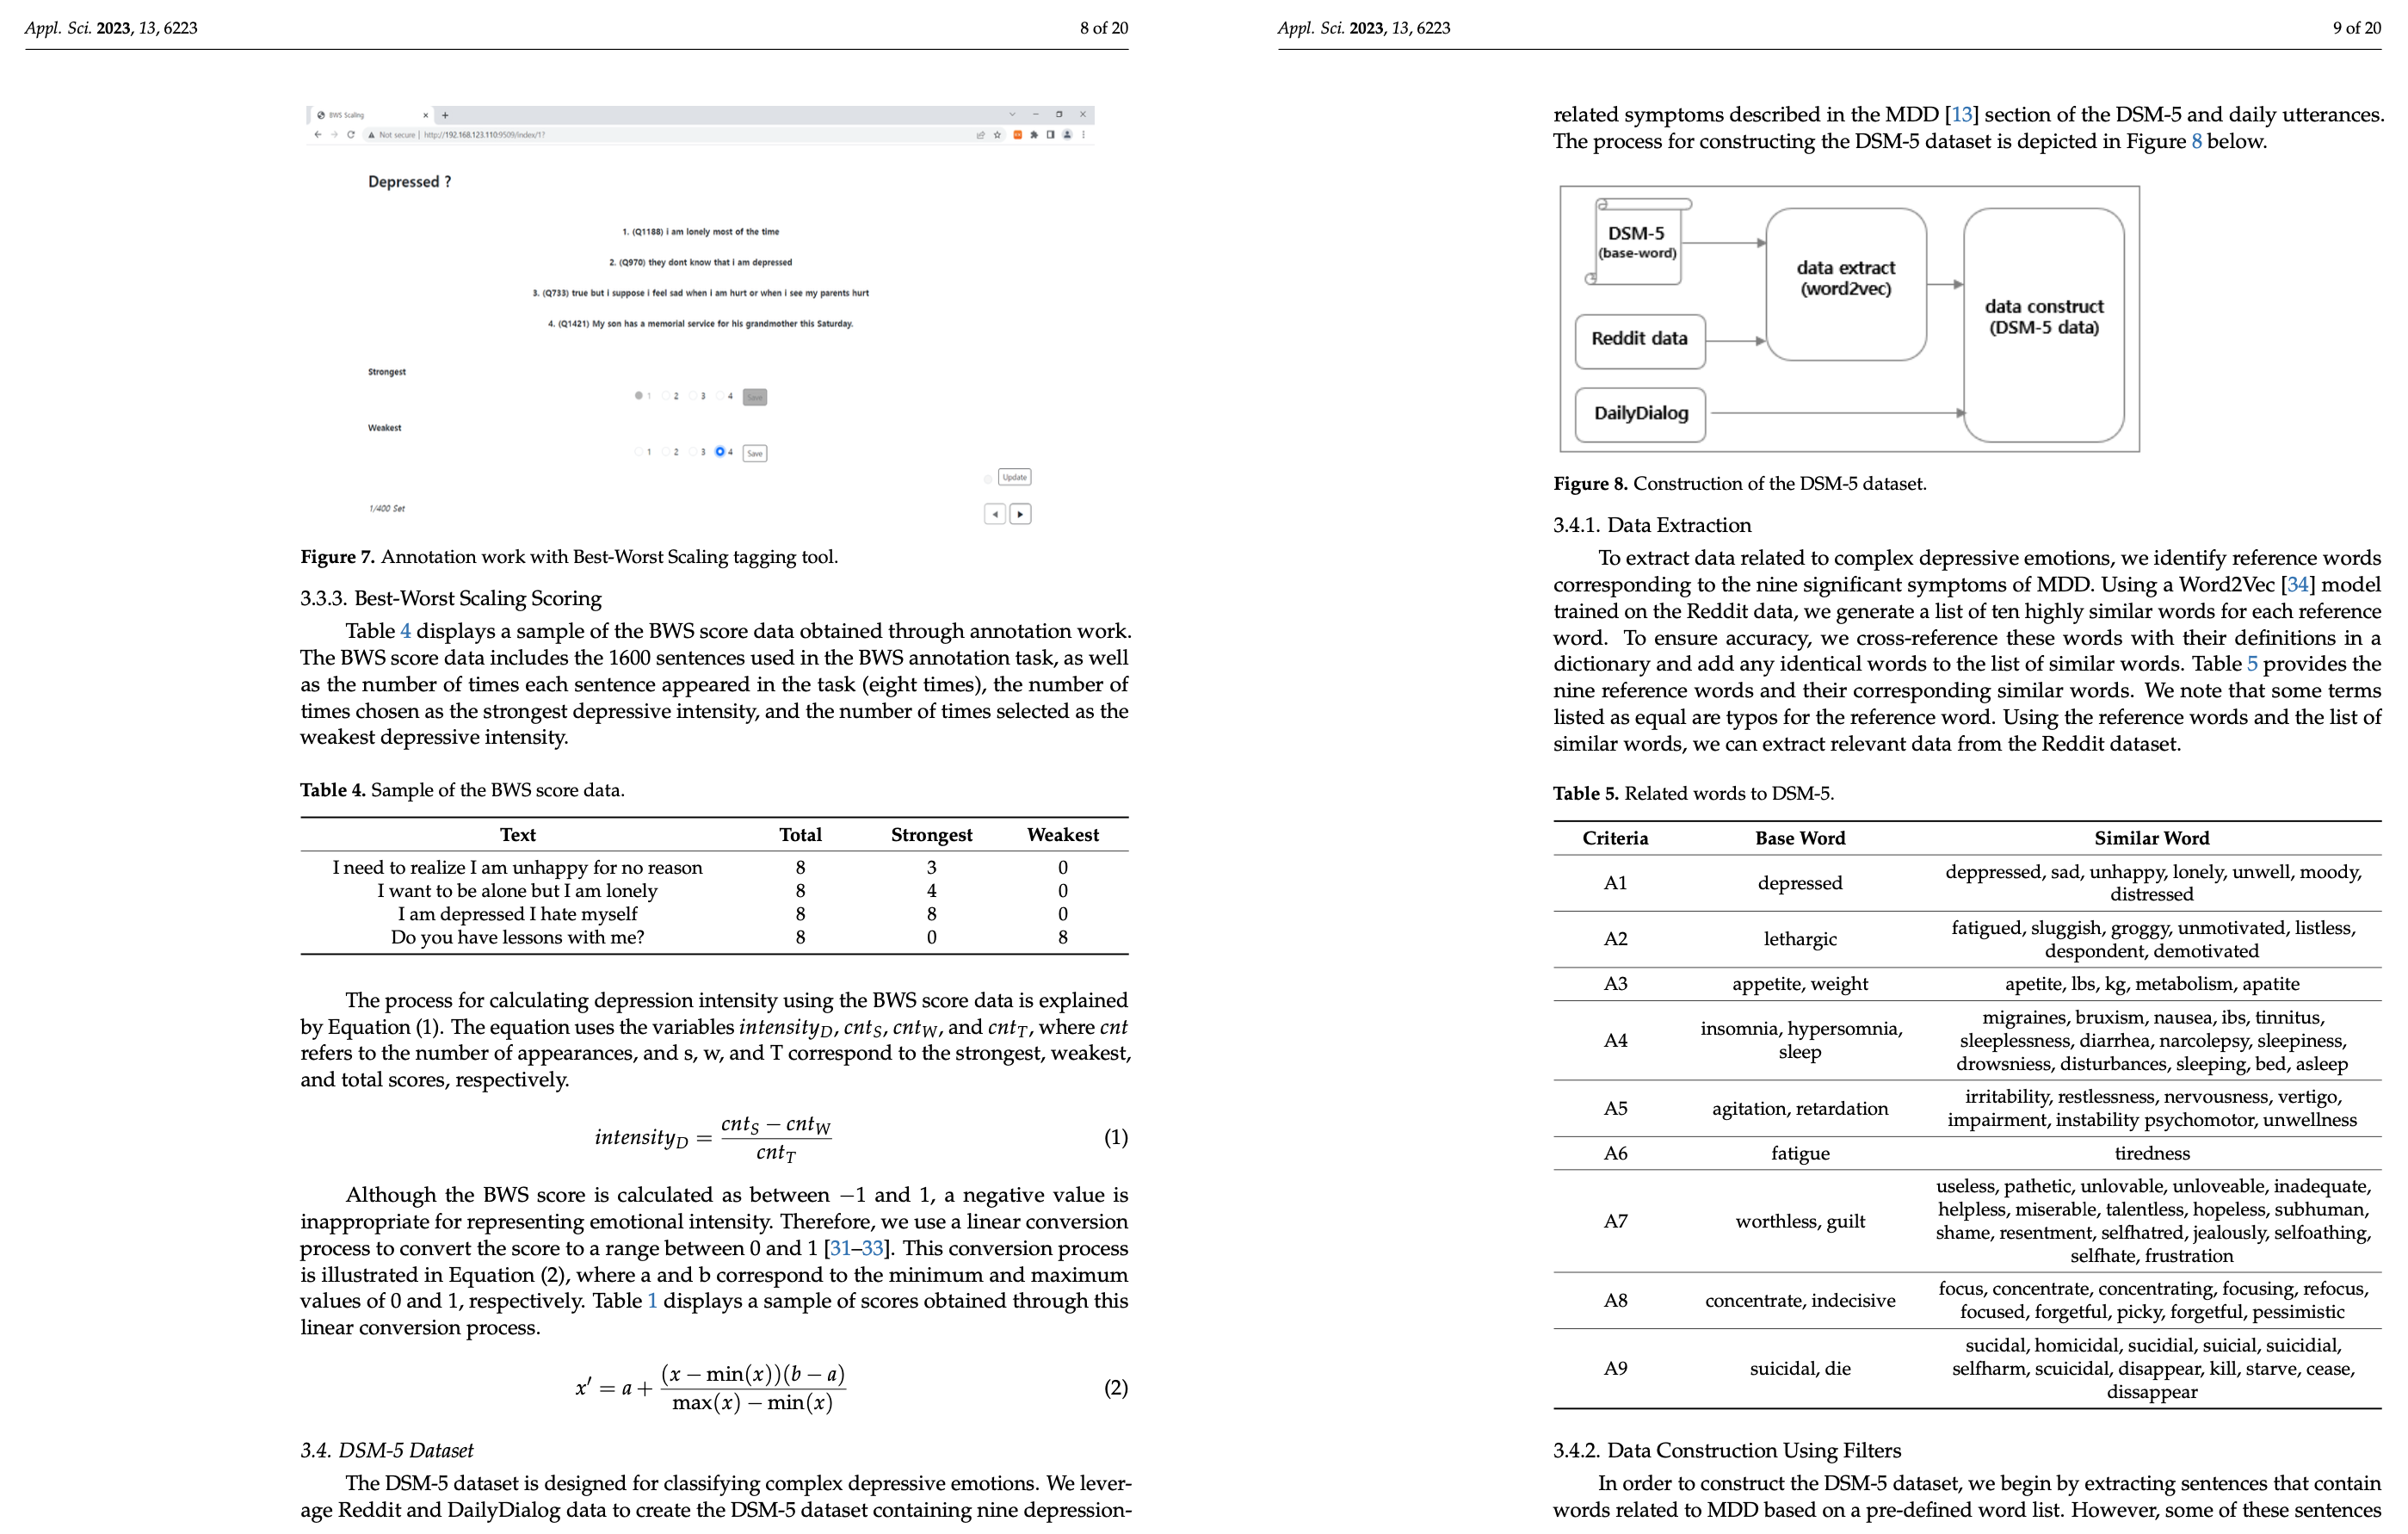
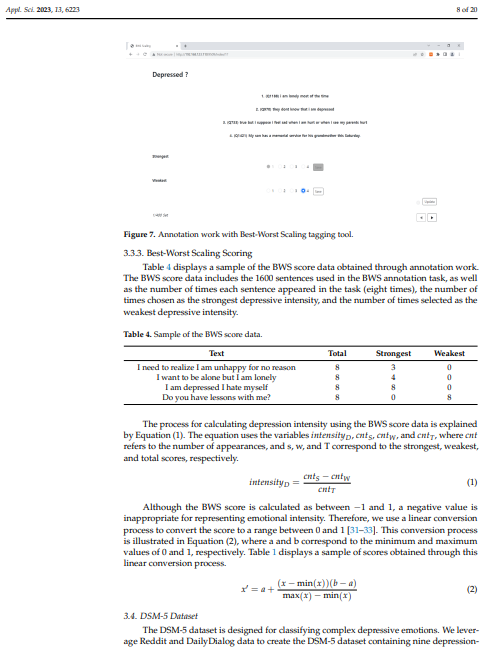
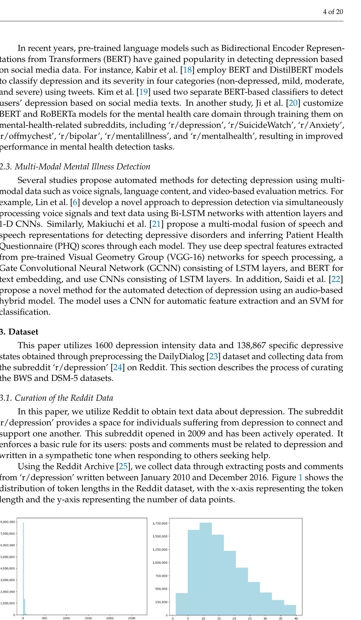
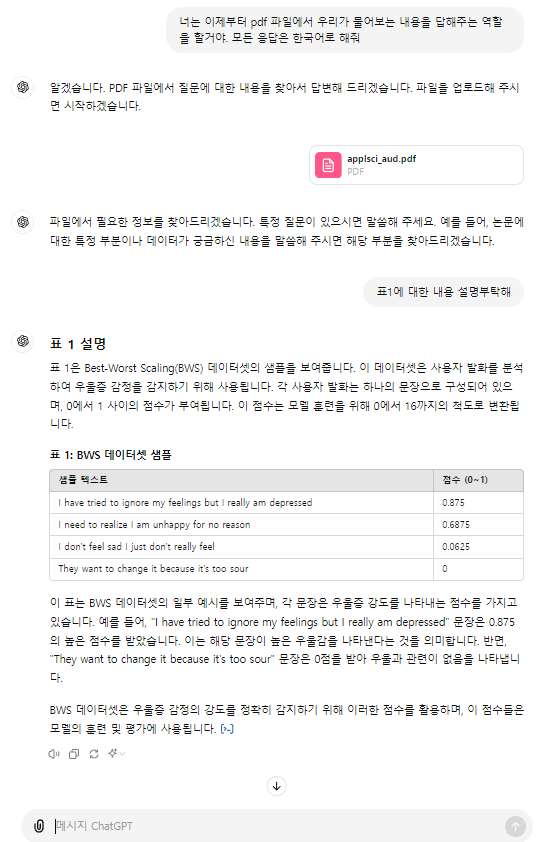
실습에 사용한 pdf 파일은 내가 작성했던 졸업 논문이다.
표, 그래프, 수식 등이 포함되어 있어 테스트 용으로 적합한듯 .. ?
ENV Setting
이번 포스트에서 실습할 기본 환경을 세팅해두자
pip install unstructured
pip install pdfminer.six
pip install 'pdfminer.six[image]'
import os
default_path = os.getcwd()
data_path = os.path.join(default_path, '../data')
data_file = os.path.join(data_path, 'applsci_aud.pdf')
pdf_file = open(data_file, 'rb')
PyPDF2 (Rule-based model)
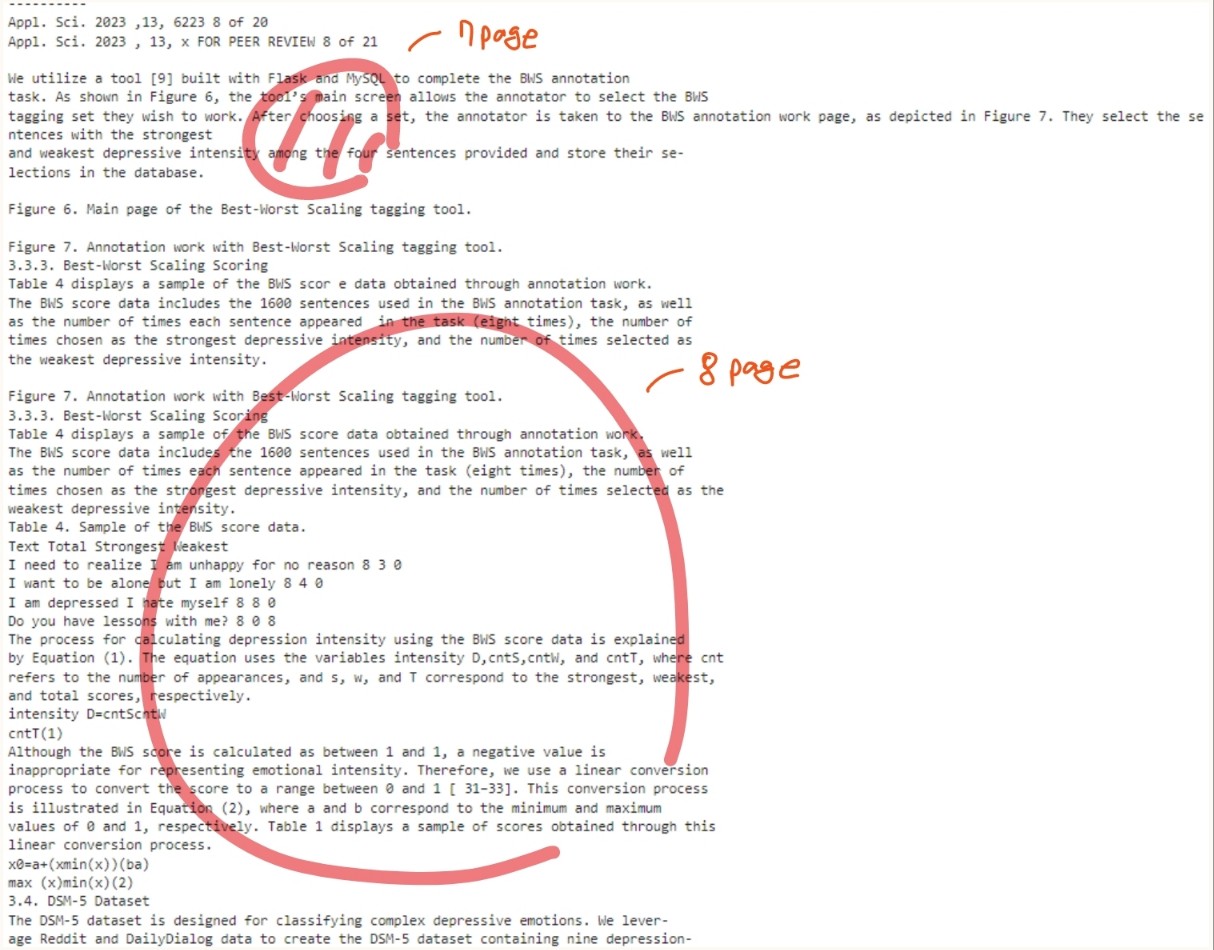
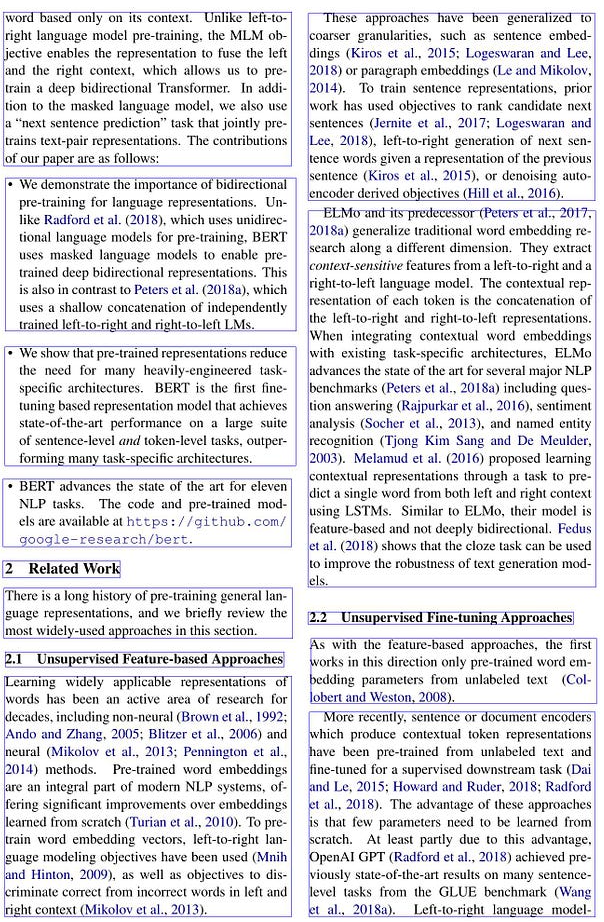
PyPDF 라이브러리를 사용하여 논문의 8 페이지에서 텍스트 추출을 진행해보았다.
텍스트 추출은 다음과 같이 진행할 수 있다.
import PyPDF2

reader = PyPDF2.PdfReader(pdf_file)
page_num = 7
page = reader.pages[page_num]   # 8쪽
text = page.extract_text()
print(f'-' * 10)
print(text)
pdf_file.close()
추출 결과는 다음과 같다. We utilize a tool ~ in the database 이 부분은 논문 8페이지의 내용이 아님에도 불구하고 같이 추출되었으며, 테이블의 내용 또한 줄 단위 텍스트 형태로 반환된 것을 볼 수 있다.
Unstructured (Deep-Learning models)
Unstructured 모델은 PDF 문서를 블록 단위로 인식한다.
from unstructured.partition.pdf import partition_pdf

elements = partition_pdf(filename=data_file, infer_table_structure=True)
tables = [el for el in elements if el.category == 'Table']
print(tables[0].text)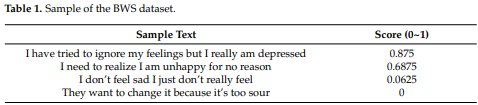
위 테이블에 대한 인식 결과는 다음과 같다.

다만 가끔가다 테이블이 아닌데, 테이블로 잘못 인식하고 알 수 없는 문자들을 출력하는 경우가 있다.

pdf 파일에 포함되어 있는 테이블과 이미지를 추출하는 코드는 다음과 같다.
from unstructured.partition.pdf import partition_pdf

partition_pdf(
    filename=data_file,
    strategy="hi_res",                                     # mandatory to use ``hi_res`` strategy
    languages=["eng", "kor"],
    extract_images_in_pdf=True,                            # mandatory to set as ``True``
    extract_image_block_types=["Image", "Table"],
    extract_image_block_to_payload=False,
    extract_image_block_output_dir=img_path,  # optional - only works when ``extract_image_block_to_payload=False``
)
위 코드를 통해 우리는 pdf 파일에 포함된 테이블과 이미지 (이미지는 텍스트 블록도 포함한다)를 얻을 수 있다. 결과 추출된 이미지를 살펴보면 다음과 같다. 블록 단위로 예상하긴 했으나, 블록의 기준이 애매한 것 같다.
Multi-modal large models
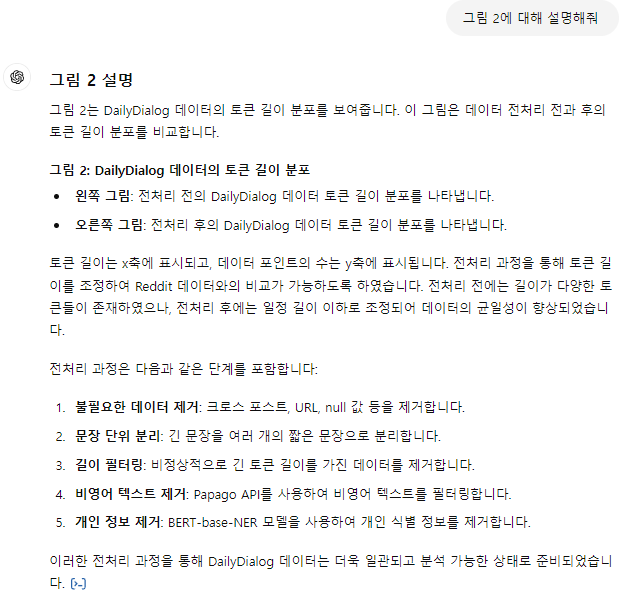
Method 01. GPT-4o
역시 GPT는 짱이야 .. !
Method 02. Table Transformer + GPT-4o
Table Transformer는 "PubTables-1M: Towards comprehensive table extraction from unstructured documents" 논문에서 가장 먼저 제시되었다. 여기서는 Table Transformer를 활용해 검색된 이미지에서 표를 잘라내고, GPT-4o에 보내 응답하도록 한다.
Env Setting
!pip install transformers
!sudo apt install tesseract-ocr
!pip install pytesseract
!pip install easyocr
!sudo apt-get install -y poppler-utils
!pip install pdf2image
!wget "https://fonts.google.com/download?family=Roboto" -O roboto.zip
!unzip roboto.zip -d ./roboto
from transformers import AutoImageProcessor, TableTransformerForObjectDetection
import torch
from PIL import Image, ImageDraw, ImageFont
import matplotlib.pyplot as plt
import csv
import numpy as np
import pandas as pd
from pdf2image import convert_from_path
from tqdm.auto import tqdm
import pytesseract
import easyocrPDF to Img
원하는 페이지 번호를 지정해주면 해당 페이지를 이미지로 변환해준다.
def pdf_to_img(file_path, page_no):
    image = convert_from_path(file_path)[page_no].convert("RGB")
    return image
Load Model
model_name = "microsoft/table-transformer-detection"
# define image preprocessor for table transformer
image_processor = AutoImageProcessor.from_pretrained(model_name)

# import table transformer model for table detection
model = TableTransformerForObjectDetection.from_pretrained(model_name, revision="no_timm")
Detect Table
def detect_table(image_doc):
    # preproces image document
    inputs = image_processor(images = image_doc, return_tensors="pt")
    # detect tables
    outputs = model(**inputs)

    # convert outputs (bounding boxes and class logits) to Pascal VOC format (xmin, ymin, xmax, ymax)
    target_sizes = torch.tensor([image_doc.size[::-1]])
    results = image_processor.post_process_object_detection(outputs, threshold=0.9, target_sizes=target_sizes)[0]
    return results
Table을 검출해보면 다음과 같이 나오며, bbox 정보를 확인할 수 있다.

다음과 같이 bbox만 추출할 수도 있다.
def get_table_bbox(results):
  tables_coordinates = []
  # iterate through all the detected table data
  for score, label, box in zip(results["scores"], results["labels"], results["boxes"]):
    box = [round(i, 2) for i in box.tolist()]
    # store bbox coodinates in Pascal VOC format for later use
    table_dict = {"xmin" : box[0],
                  "ymin" : box[1],
                  "xmax" : box[2],
                  "ymax" : box[3]}
    tables_coordinates.append(table_dict)
    # print prediction label, prediction confidence score, and bbox values
    print(f"Detected {model.config.id2label[label.item()]} with confidence "f"{round(score.item(), 3)} at location {box}")
  return tables_coordinates

table_bbox = get_table_bbox(results)
검출한 테이블을 이미지에 빨간 상자로 그려보자
def highlight_tables(image, table_bbox, padding):
    # Create a drawing context for doc image
    doc_image = image.copy()
    draw = ImageDraw.Draw(doc_image)

    # Iterate over each table in the list
    for table in table_bbox:
        # Define the coordinates for the rectangle with padding for each table
        rectangle_coords = (table["xmin"] - padding,
                            table["ymin"] - padding,
                            table["xmax"] + padding,
                            table["ymax"] + padding)
        # Draw a red rectangle around the detected table
        draw.rectangle(rectangle_coords, outline="red", width=2)
    return doc_image

padding = 10
table_detected_image = highlight_tables(image, table_bbox, padding)
table_detected_image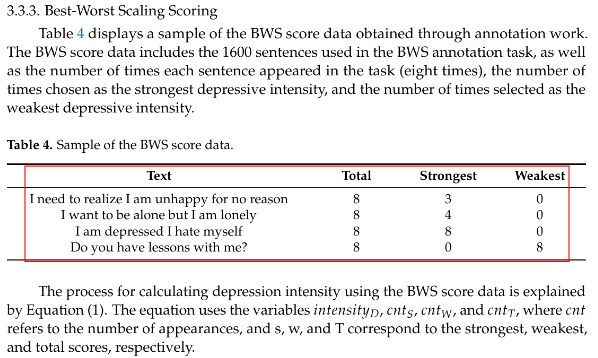
Crop Table
얻은 bbox 좌표를 활용하여, 테이블만 따로 잘라낼 수 있다.
def get_cropped_image(image, table, padding):
  # Create a new image object with the cropped area
  cropped_image = image.copy().crop((table["xmin"] -padding,
                             table["ymin"] - padding,
                             table["xmax"] + padding,
                             table["ymax"] + padding
                             ))
  return cropped_image

cropped_image = get_cropped_image(image, table_bbox[0], padding)
cropped_image.save(f"{file_name}.jpg")
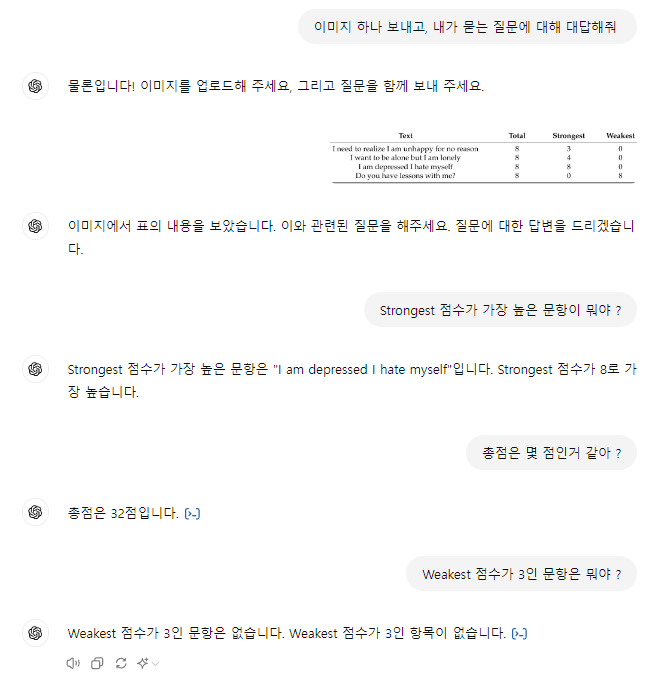
GPT-4o에 전달
다시 한번 역시 ChatGPT라는 것을 깨닫는다.
Nougat
Nougat는 문서 페이지를 마크업으로 변환하기 위한 종단 간 학습 가능한 인코더-디코더 트랜스포머 기반 모델으로, Donut에 기반하고 있다. 라이브러리 설치만 하면 추출하는 것은 간단하다. CPU에서 추출하는 것은 상당히 느리므로, GPU에서 진행하자
!pip install nougat-ocr
# or
!pip install git+https://github.com/facebookresearch/nougat
다음 명령어를 통해 파일을 추출할 수 있다.
nougat path/to/file.pdf -o output_directory하지만 다음과 같은 오류가 뜬다.

해당 오류를 찾아보니 transformer 4.38.2 이하 버전인 경우 발생할 수 있는 오류라고 한다. (현재 버전: 4.39.3)
나는 4.38.2보다 높은 버전을 사용하고 있었지만, 혹시 몰라 4.38.2 버전을 재설치하고 다시 실행했다.
!pip install transformers==4.38.2
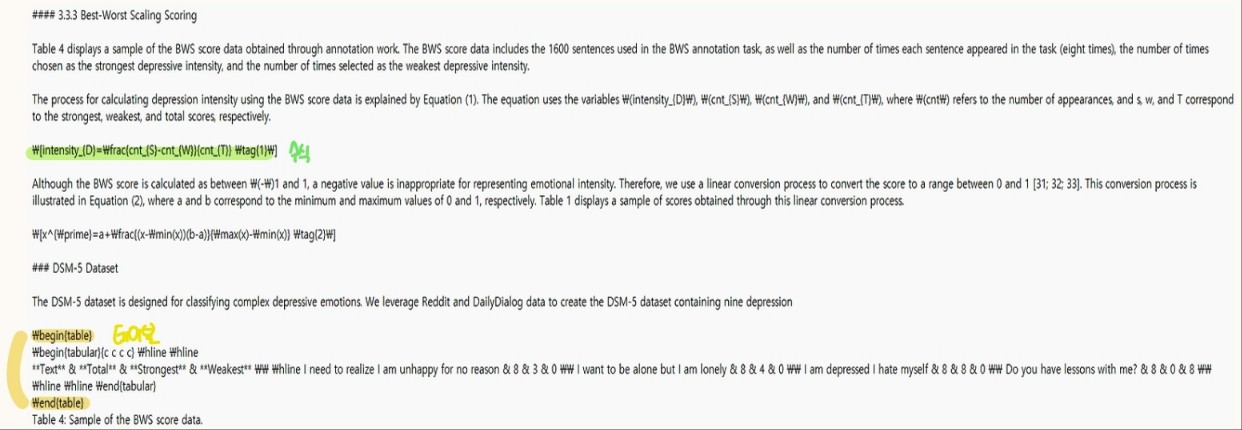
!nougat data/applsci_aud.pdf -o ./data/실행이 완료되면 우리는 mmd 파일을 얻을 수 있다. nougat을 통해 추출된 결과물을 살펴보면, 테이블은 \begin{table} ~ \end{table} 형태로 감싸져있고, 수식은 \[ ] 기호로 감싸져 있는 것을 확인할 수 있다.
Ref.
https://docs.unstructured.io/open-source/core-functionality/partitioning#partition-pdf
'AI > Natural Language Processing' 카테고리의 다른 글
| Exploring Semantic Chunking (실습) (0) | 2024.06.26 |
|---|---|
| Re-ranking (실습) (0) | 2024.06.24 |
| Enhancing Global Understanding (0) | 2024.06.19 |
| Query Classification and Refinement (2) | 2024.06.18 |
| Corrective Retrieval Augmented Generation (CRAG) (0) | 2024.06.18 |
블로그의 정보
코딩하는 오리
Cori